ก่อนการ Add Gmail Account ลงบนโปรแกรม MS Outlook ให้เราเข้ามาตรวจสอบว่าการตั้งค่าแบบ IMAP เปิดอยู่หรือไม่ โดยทำการ Sign In เข้าไป Gmail.com ด้วยบัญชีอีเมล์และรหัสผ่านของเรา
วิธีตั้งค่า Enable IMAP ใน Gmail.com
- ไปที่ตั้งค่าขวามือด้านบน รูปเฟือง (Configuration)
- จะมีแถบเมนูเลื่อนลงมาให้เลือกไปที่ ตั้งค่า (Settings)
- แถบเมนูด้านบนเลือกไปที่ การส่งต่อและ POP/IMAP (Forwarding and POP/IMAP)
- หัวข้อ การเข้าถึง IMAP ให้เลือก ใช้ IMAP (Enable IMAP)
- คลิก บันทึกการเปลี่ยนแปลง (Save Changes)
 |
| Sign in ด้วยบัญชี Gmail ของเรา และไปที่ Settings |
วิธี Add Email Gmail หรือ Google Apps บน MS Outlook (IMAP)
1. ไปที่ File > info > Add Account
 |
| หน้าแรกของ MS Outlook |
2. เลือก
Manually configure server setting or additional server types
 |
| หน้า Add New Account |
3. เลือกที่
Internet E-mail
 |
| กดปุ่ม 'Next' |
4. ใส่ค่าต่างๆลงไปให้ครบและถูกต้อง
Account Type :
IMAP
Incomming mail server:
imap.gmail.com
Outgoing mail server (SMTP):
smtp.gmail.com
จากนั้นคลิกที่
More Settings ...
 |
| คลิกปุ่ม 'More Settings' เพื่อตั้งค่าเพิ่มเติม |
5. จะได้หน้าต่าง Internet E-mail Settings
ไปที่แถบ Outgoing Server
เลือกติ๊กถูกที่
My outgoing server (SMTP) requires authentication
 |
| Internet E-mail Settings |
6. จากนั้นเลือกไปที่แถบ
Advanced
Incoming server (IMAP)
: 993 or 143 (SSL)
Outgoing server (SMTP)
: 25 or 465 (TLS)
 |
| เมื่อใส่ค่าครบแล้วคลิกที่ OK |
7. คลิกปุ่ม
'Test Account Settings...'
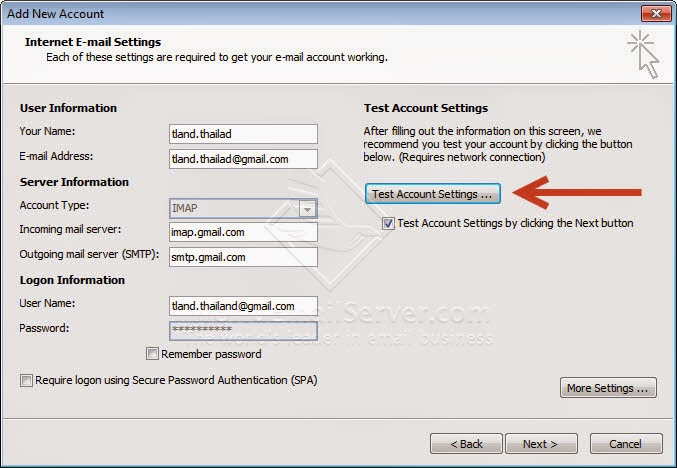 |
ทดสอบการเชื่อมต่อกับ Google Server ว่าสมบูรณ์หรือไม่
|
8. หากทำการทดสอบ Account แล้ว Status จะขึ้นว่า
Completed
 |
| ทดสอบ Account เรียบร้อยคลิก Close > Next |
9. คลิก
Finish เป็นอันเสร็จสมบูรณ์
บทความที่เกี่ยวข้อง
บริษัท เทคโนโลยีแลนด์ จำกัด
www.technologyland.co.th


