1. ให้ทำการเข้า link : https://mail.technologyland.co.th/maildee/
 |
| Log in อีเมล์ , รหัสผ่าน เพื่อเข้าระบบ |

|
|
| Log in อีเมล์ , รหัสผ่าน เพื่อเข้าระบบ |
 |
| Open App |
 |
| Go to Preferences |
 |
| Teb '+' |
 |
| Other Mail Account |
 |
| Type email account and password |
 |
| Ex Type email account and password |
 |
| Teb 'Account Type : POP' |
 |
| Email address, Username = Your email account Type : IMAP Incoming mail server : mail.technologyland.co.th Outgoing mail server : mail.technologyland.co.th |
 |
| Teb 'Server Settings' |

 |
| Incoming : Port: 993 Security type: SSL/TLS Outgoing : Port: 465 Security type: SSL/TLS จากนั้นกด Save |
 |
| Open App |
 |
| Go to Preferences |
 |
| Teb '+' |
 |
| Other Mail Account |
 |
| Type email account and password |
 |
| Ex Type email account and password |
 |
| Email address, Username = Your email account Type : IMAP Incoming mail server : mail.technologyland.co.th Outgoing mail server : mail.technologyland.co.th |
 |
| Teb 'Done' |
 |
| Teb 'Server Settings' |
 |
 |
| Incoming : Port: 993 Security type: SSL/TLS Outgoing : Port: 465 Security type: SSL/TLS จากนั้นกด Save |

 |
| Go to 'Settings' |
 |
| Tab 'Accounts' |
 |
| Tab 'Add account' |
 |
| Tab 'Email' |
") |
| Other (POP3/IMAP) |
 |
| Type email account and password, then tab 'Manual setup' |
 |
| Account type: POP3 |
 |
| Email address, Username = Your email accountPOP3 server: mail.technologyland.co.thPort: 995 Security type: SSL/TLS (accept all certificates) |
 |
| Click 'Next' |
 |
| SMTP Server: mail.technologyland.co.thPort: 465 Security type: SSL/TLS (accept all certificates)Username: Your email accountPassword: Your email password Click 'Next' |
 |
| Click 'Next' |
 |
| Click 'Next' |
 |
| Go to Email App |
 |
| Inbox message of the account |
 |
| วิธีการ เพิ่มบัญชีอีเมล์ในโปรแกรม Outlook Type POP ด้วย Port SSL |
 |
| 1.เมื่อเข้ามาที่ Program Outlook แล้ว ให้เข้าไปที่ File > Info > Add Account ตามภาพ |
 |
| 2. คลิกไปที่ Manually Configure Server Setting or Additional Server Types > Next |
 |
| 3.คลิกไปที่ Internet Email > Next |
 |
| 4.เมื่อเข้ามาในหน้า Setting ให้ใส่รายละเอียด ดังนี้
User information
You Name : ชื่อผู้ใช้
Email address : ชื่อบัญชีอีเมล
Server informationAccount type : ใส่ POP Incoming mail server : mail.technologyland.co.th Outgoing mail server : mail.technologyland.co.th Login information User name : ชื่อบัญชีอีเมล Password : รหัสผ่านของบัญชีอีเมล
เมื่อใส่รายละเอียดทั้งหมดเรียบร้อยแล้วให้กดไปที่ More Setting...
|
 |
5.เลือกที่เมนู Outgoing Server ทำเครื่องหมายที่ My outgoing server (SMTP) ..... กด OK
|
 |
| เลือกที่เมนู Advanced Incoming server (POP3) Port: 995 (SSL) Outgoing server Port: 465 (SSL) ทำเครื่องหมายที่ Leave a copy of messages on the server ไม่อย่างนั้นข้อความจะถูกดูดลงเครื่องหมด และติ๊กที่ Remove from server after 14 days เพื่อให้ Inbox บน Server ไม่มีวันเต็ม |
 |
| 7.เมื่อกด OK จะทำให้กลับมาหน้า Setting ให้กด Next เพื่อ Test Account Setting แล้วกด Close |
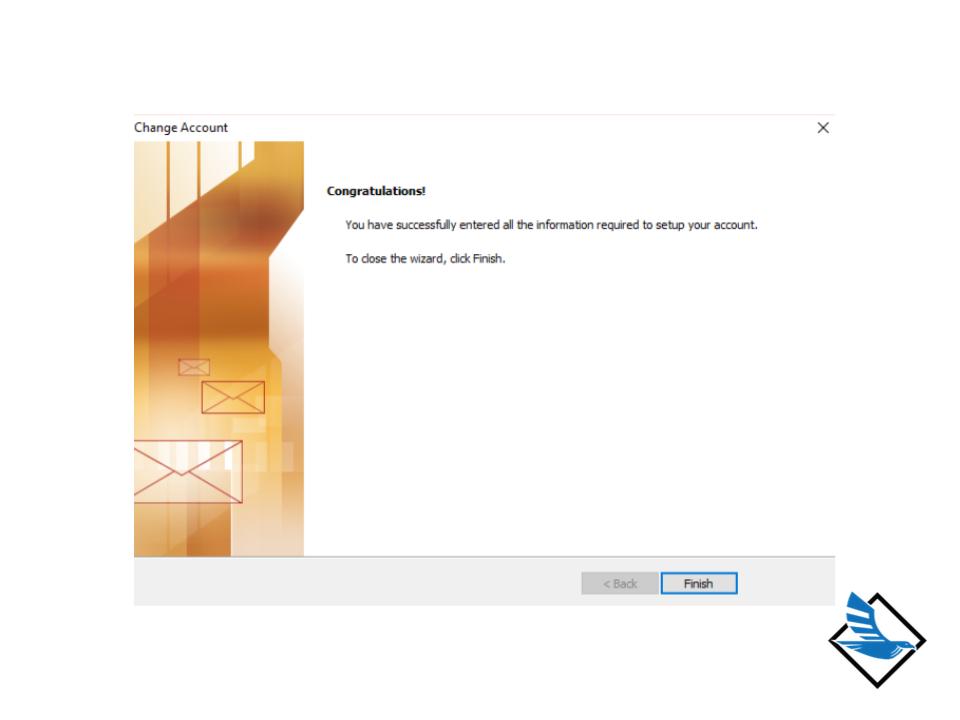 |
| 8.การตั้งค่าเสร็จสิ้น คลิก Finish |

 |
| Go to Settings |
 |
| Tab 'Accounts' |
 |
| Tab 'Add account' |
 |
| Tab 'Email' |
") |
| Other (POP3/IMAP) |
 |
| Type email account and password, then tab 'Manual setup' |
 |
| IMAP |
 | ||
| Email address, Username = Your email account IMAP server: mail.technologyland.co.th Port: 993 Security type: SSL/TLS (accept all certificates) |
 |
| Click 'Next' |
 |
| SMTP server: mail.technologyland.co.thPort: 465 Security type: SSL/TLS (accept all certificates)Click 'Next' |
 |
| Click 'Next' |
") |
| Click 'Next' |
 |
| Email App |
 |
| Inbox message of the account |